Tuesday, August 26, 2014

My thoughts on Living Proof...

Hair lovers, rejoice!  


After including the Living Proof Restore Shampoo & Conditioner in my favorites post, I had several readers ask for a more in depth review of the products.  You may ask, are these products worth the splurge?  Is there a drugstore option that works just as great?  Now, I am not one to buy expensive shampoo & conditioner.  In fact, these were given to me as a gift from my mom after she found she was allergic to an ingredient in these products.  I was pumped to try them--especially since I have blonde (which can sometimes be over processed and dry) hair.  So, the restore line was great for me to try.  I found that after 4 weeks of using ONLY this shampoo and conditioner my hair has changed for the better!  Now, I just got it highlighted last week, so it's a bit drier now, but I have no doubt that with continued use of these products it will bounce right back.  I have never been so pleased with a shampoo and conditioner!


Next up is the Living Proof Prime Style Extender.  This stuff smells amazing and gives you a super smooth blow-out.  BUT, I bought it to extend my styling.  And, I don't think it does much for that.  Sad day.  I will use it until it's gone because it provides heat protection... but for the hefty price tag it's just not worth it... in my opinion!!!  


Ah, the famous Living Proof Perfect Hair Day--described as a "5-in-1 styling treatment."  I like this stuff a lot.  It actually reminds me of the style extender but with more benefits.  This will condition, volumize, strengthen, provide smoothness, and polish your hair in one easy step.  I feel like this product has helped the health of my hair and I've enjoyed using it.  But, my Moroccan Oil Light also does all of those steps... and I don't like to weigh my hair down with a zillion products, so I would not re-purchase. 


Those are just some of my personal opinions of the Living Proof hair range.  I want to try more products within the "restore" line, since I loved the shampoo & conditioner so much!

Find the line here on Sephora.com. I'm dying to try the new Instant Texture Mist! 

What are your MUST HAVE hair products?  I'd love to know!
Have a great week, everyone. :-)

xoxo, Molly


Tuesday, August 19, 2014

If you buy one thing this month...

So, normally I'm not one to boast about primers.  I actually thought they didn't do anything until I started using the Hourglass Veil Mineral Primer SPF 15  and was amazed at how much longer my makeup stayed on.  So, I did some research on other primers, and I found this one to be brand new from TwoFaced: the HangoveRx Replenishing Face Primer.  Let me tell you... it does not disappoint.  I am currently obsessed with it!


Here is the description from sephora.com: A replenishing face primer that hydrates, smoothes, and brightens skin for a dewy, healthy looking finish. Cure your next beauty hangover with Hangover, a revolutionary makeup primer that's infused with coconut water, a probiotic-based ingredient, and skin revivers which work together to boost skin’s radiance, promote elasticity, and help hydrate while locking down makeup for fresher, longer, and more flawless wear. Too Faced harnessed the science of hydration to create a creamy, penetrating primer that acts like an energy drink for the skin by replenishing moisture levels. It can be worn alone for a dewy, healthy looking finish, or under bronzers, foundations, and powders to create the perfect canvas. 

Sign me up!


This primer does exactly what the description says.  I apply it right after my moisturizer, and it sinks into the skin quickly.  The smell is amazing...just like coconut milk.  It makes my skin feel comfortable and hydrated all day long, AND makes my makeup last all day.  I even think it's helped my skin become brighter!  I also love wearing it alone without makeup.  It makes my skin look and feel healthy.  I love it!

xoxo, Molly :-)


Tuesday, August 12, 2014

First Impression Review | Yves Saint Laurent Gloss Volupté

Happy Tuesday, everyone!  Today I have a first impression review on the (semi) new glosses by YSL.  When these came out I couldn't wait to get my hands on one.  With a whopping price tag of 32$ I picked up only one.  I actually went into Nordstrom with the mindset that if this gloss wasn't amazing, I would return it.  Well days later, I couldn't justify the price, and it went back to Nordy's.  BUT, in the glosses defense I think I grabbed a not-so-great color.  I picked up color 203 Coral Gondoura, anddddd it looked just like my lips but more shiny.  I did love the scent.  It smelled like fresh watermelon.  But, for 32$ I couldn't keep a gloss because of the scent, ha.  

Within the next couple months I started hearing more hype about these glosses.  I never got a chance to go back to Nordstrom and check them out (Nordstrom was in Atlanta, not where I lived), so I didn't pick any back up.  Pretty soon I was able to swatch them in Sephora!

Last week, at the VIB Rouge event, I was able to grab this sample pack of three of the colors.  I thought I could do a first impression/review of my thoughts! Enjoy! :-)


So the package include three shades: a muted pink-nude shade with gold "shimmer", a bright fuchsia color with gold "shimmer", and a bright coral color.  


It came with a sample brush which imitates the brush the glosses come with.  It was specifically designed to hug your lips for proper and precise application.  My opinion? This isn't needed.  I usually blend my glosses out with my fingers anyways... but, it's YSL.  What do you expect? 


N*19 Rose Orfevre : I usually love a nude pink shade.  And if you throw in some shimmer, I'm sold! But, this isn't just shimmer, this is gold chunks.  I felt as if my lips were chapped while I was wearing this.  It wore off pretty quickly as well... probably because I kept messing with it, because it was pretty uncomfortable to wear.  

N*19

N*49 Terriblement Fuchsia : This color... gorgeousness.  This shade also had some shimmer, BUT it was nothing like N*19.  This was a good amount of shimmer, shimmer I can handle, haha.  I actually think I may pick this shade up.  It is a unique color--not just something you can find a dupe for at the drugstore.  It wore for a long time, was non-sticky, and it smelled of the famous YSL watermelon scent. :-) 

N*49

N*204 Corail Trapeze : This color was also a winner.  I don't think it was as unique a shade as N*49, but I still liked it.  This shade had so shimmer and was just very shiny and glossy.  It smelled wonderful and wore for a long time.  It is a perfect color for summer!

N*204

When I first swatched these I thought, wow all of these colors are so much better than the first shade I bought, haha.  The verdict: each gloss has different pigmentation and formula, they smell amazing, they are pretty long wearing, the original packaging is stunning, but watch out for chunks of glitter.  I would suggest trying them at Sephora before purchasing. :-)


Check out the glosses here.

Hope you enjoyed this post.  What do you think?  Will you be picking these up?

xoxo, Molly 

Thursday, August 7, 2014

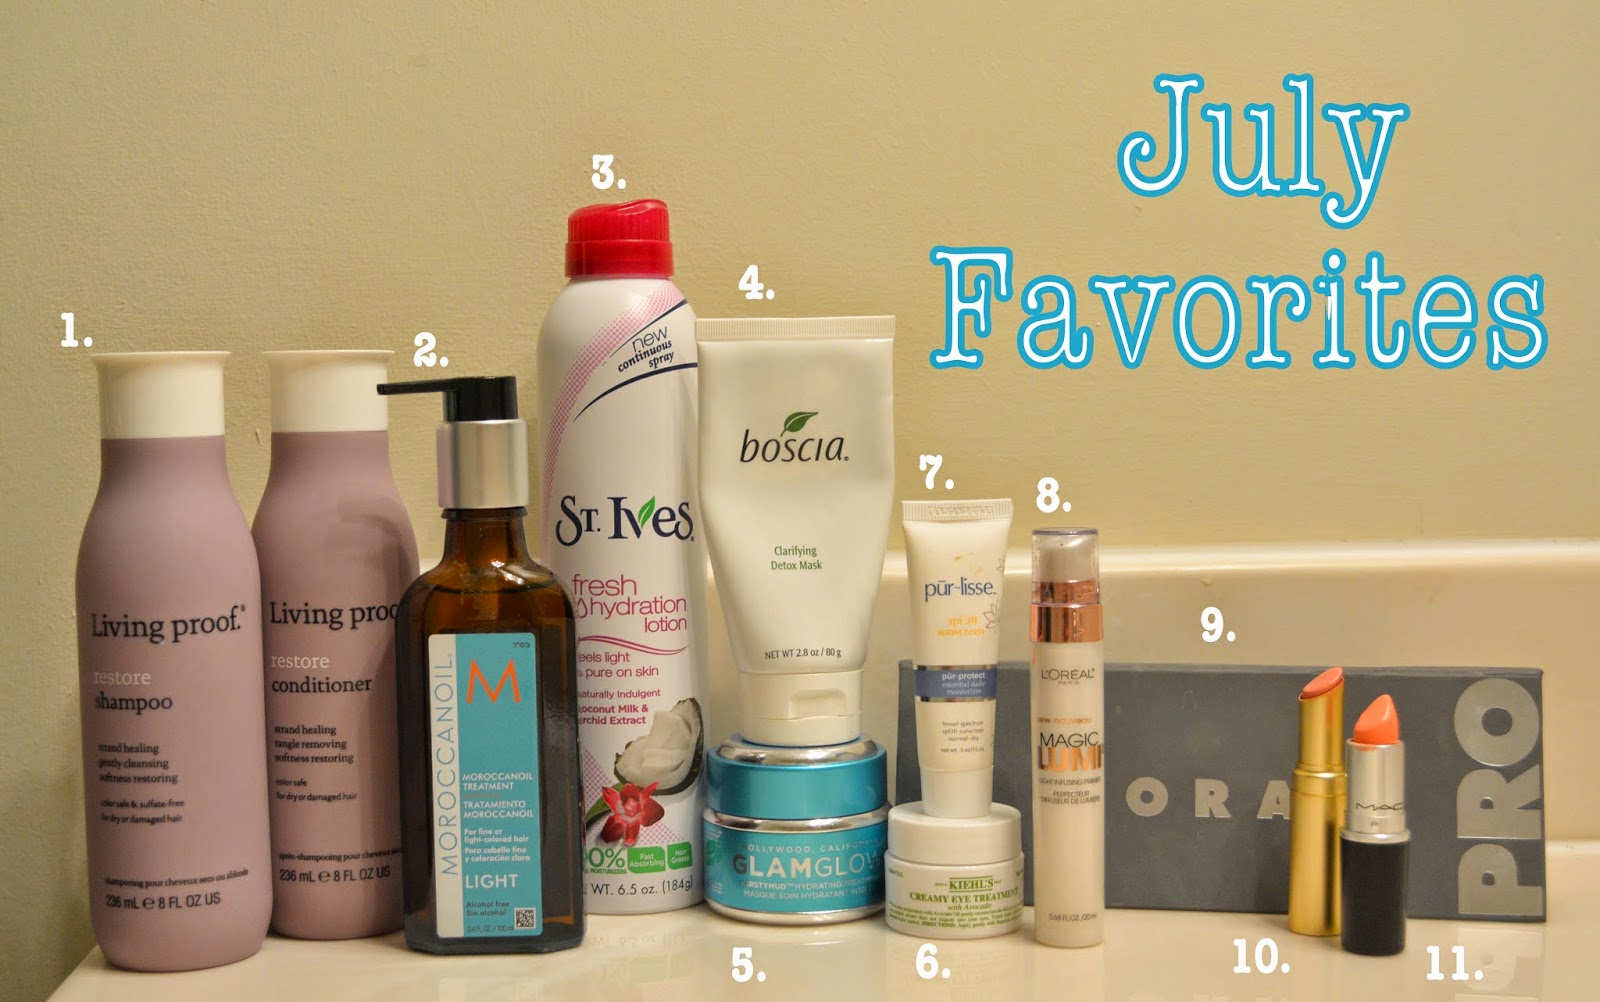
July Favorites!

Happy Thursday!  It has been SUCH a crazy two weeks for me and Ryan!  We are moving to Greenville TOMORROW, and we have had so much to do!  We went to Isle of Palms Sunday-Tuesday for a quick get-a-way before more moving madness.  We thought, well, when is the next time we will both be unemployed? (God willing, hopefully not for a while!)  Ryan starts his job this coming Monday, and I am still looking for an opportunity.  Long story short, we wanted a quick vacation before real world started again.  

Anywho, today I have for you my July Favorites! I'll keep my thoughts brief as we still have some crazy packing to do before tomorrow, AND Ryan is taking me out to dinner for my birthday tonight so I've got to get ready! :)


1. Living Proof Restore Shampoo & Conditioner: Okay, so I'm not one to purchase shampoo and conditioner if it's NOT at the drugstore (what's the point it just goes down the shower drain?) BUT, these two products have changed my hair for the better.  When I recently cut it shorter after the wedding, over styling made it super dry.  These have helped tremendously just in the short few weeks I've used them.  Big fan! 

2. Moroccan Oil Light: A holy grail product for me... oh wait, I was without it for 6 months.  So i've probably gone through 2 whole bottles of this stuff.  But, for the last couple months I haven't had the opportunity to buy it because I don't think anywhere in Macon sells it (and every time I go to ATL I forget... sad.)  Anywho, I finally got my hands on it and once again, my hair is happy.  Blonde girls, get the light version... my hair drinks it up and isn't heavy.  It's worth the splurge. :-)

3. St. Ives Fresh Hydration Lotion in Coconut Milk and Orchid Extract: I picked this up from the drugstore after seeing some hype.  Best 5 dollars ever spent.  Okay, thats a bit dramatic, but I really really love this stuff. Sinks right in, moisturizes, and smells fantastic. Quick tip, using this while your self tanning keeps your tan from getting splotchy.  Love it!

4. Boscia Clarifying Detox Mask: My clarifying mask of choice this month!  Since using up my Supermud Skin Clearing Treatment by Glamglow, I've been going back to all the masks I own that I haven't used up.  Absolutely love this one!  I forgot how well it works.  

5. Glamglow Thirstymud Hydrating Treatment Mask: EEEK. I love this stuff. Dry skin girls, this will change your life!... actually just your face. It smells like honey and yummy stuff. 

6. Kiehl's Creamy Eye Treatment with Avocado: For some reason, the skin around my eyes have been crazy dry lately.  Instead of piling on what normal cream I put around that delicate skin, I pulled this little guy out.  I use it in the winter when I have really dry skin.  3 days later, my eyes are back to normal! :-)

7. Pur-lisse SPF 30 Sunscreen Daily Moisturizer: I got this in my July Ipsy Bag! I really like it.  It provides lasting protection and is a great moisturizer. 

8. L'oreal Magic Lumi Primer: This is one of my favorite products from the drugstore (Holla if you'd like to see my other favorite drugstore products!!!) It's comparable to the Strobe Cream/Lotion from MAC, but it's lighter in consistency.  It easily makes your complexion look radiant and holds your makeup on longer than without using a primer.  


9. Lorac Pro 2 Palette: Oh how I love this palette.  Gorgeous cool-toned colors, creamy formula, great mattes.  Buy this. :-)

10. Two Faced Lipstick in Taffy: I've kept this in my purse for a few weeks, and I just love the natural color it gives and how moisturizing it is.  


11. MAC Lipstick in Sweet & Sour: This color is so fun!  You can really build it up or sheer it out.  The picture below is the color built up.  MAC never disappoints with their lipsticks. 


Well, I'm off to dinner for my birthday! 
Please comment below, and let me know what products you loved this month! :-)

Thursday, July 31, 2014

Product RoundUp | Facial Sprays


So as you can probably see from my posts, I kind of have an obsession with facial sprays.  They have so many uses!  I use them them for toners, for extra hydration, for making makeup last, or as just a pick-me-up during the day when my makeup or skin is feeling a bit... well, blah.  Here are my favorites (actually all of the ones I own, haha) and I'll share with you how I use them. :-)

1. Urban Decay Chill Makeup Setting Spray : This is part of the makeup setting spray line by Urban Decay. This one is called "Chill" for the reason that it works along with the temperature to control how your makeup rests on your face.  Strange? Yeah I thought so too.  I'm not so sure it keeps your makeup feeling "chilled" all day, but it is great for cooling and hydrating right when you apply it.  I have skin more on the dryer side, which is why I went for this one over the one designed for oily skin.  I think it's great for keeping your makeup put,  and I will definitely re-purchase. 

2. Caudalie Beauty Elixer : If you love reading other beauty blogs like I do, I'm sure you've heard of this little gem.  I'm not exactly sure what this stuff does, but I just like it.  It is a part-toner, part-serum mist packed with essential oils, and my skin loves it.  I re-purchased it because when I ran out, my skin missed it.  It smells amazing.  I think it's like a little magic potion.  My best friend, Lane, works at Sephora and she was telling me all about it one day.  If you know Lane, ask her what the story is on it. :-)

3. Mario Badescu Facial Spray with Aloe, Herbs, and Rosewater : This is probably the most all-purpose of the sprays I own.  You can use it to hydrate your face/skin, you can use it to set your makeup, or your can use it on your dry hair throughout the day.  Out of all those uses, I find it best for adding a bit of hydration into my skincare routine.  It's very refreshing, and it's great for soothing sunburn!  The mister isn't the best, it comes out a little strong, but for the price, I can get over that. 

4. MAC Fix + : I had high, high hopes for this spray.  But, I think it may be breaking me out.  It smells amazing, and feels amazing, but I started developing these little tiny bumps on my forehead and this was the only thing I changed in my routine.  I've stopped using it and they are going away.  Sad day.  But, I love the way it makes my skin feel... so hydrated!  The good news is, it's very good for using on your brushes when you want your eyeshadows more vibrant.  You can dip your brush into the shadow and then spray the Fix + onto the brush, and when you apply it, you have gorgeous color!  

5. Urban Decay All Nighter Makeup Setting Spray : You've read about this one before!  Great for making your makeup last.  Spray it before you apply your foundation, spray it after you apply... viola! 

6. Dermalogica Antioxidant Hydramist : This is the most "age-friendly" out of all the sprays.  Dermalogica is just an awesome skin-care brand all around.  Everything I try by them, I end up loving!  This spray is no exception.  Great for adding hydration and relieving your skin of that "tight-feeling."  I keep this small bottle in my purse.  It's amazing for an afternoon pick-me-up. :-) Plus, it protects against free radicals.  This is my top pick out of all the sprays I own!  

Have you tried any you love? Please share your favorites!!

xoxo, Molly 


Tuesday, July 29, 2014

Andi Dorfman Make Up Look!

How many Bachelorette fans are reading this?? :-) After seeing how gorgeous Andi Dorfman looked on the Bachelorette After the Final Rose last night, I couldn't help but try to re-create her make up look!  I included some pictures, but I apologize, I couldn't find many of her smiling because I took them from the clips of her talking with Nick... haha!


Andi always glows.  First off, she's naturally PERFECTION, so she doesn't need to doll herself up too much or she will look way over done.  Secondly, when you see her, her make up is rarely heavy.  She always has bronzed, even skin tone, long lashes, and that so-buzzed-about "Kylie Jenner" lip.  Her look last night was so appealing I decided to try it for myself this morning.  I will share with you step-by-step what I used and how I used each product.  


1. Base:  For this I used my Lo'real True Match Foundation.  Andi glows, but never has unwanted shine.  She opts for a matte finish with bronze cheeks.  I chose Lo'real True Match Foundation in W6 for my base because it is the darkest foundation I own, and it has a natural yet glowy finish!

2. Eye shadow primer and eye shadow:  I first applied an eyeshadow base.  I used MAC's Painterly Paint Pot because it provides a smooth canvas for blending your eyeshadows.  Since Andi always opts for a neutral eye, I used my Urban Decay Naked Basics palette.  I put Foxy and WOS all over the eye lids using a MAC 217 brush.  Using the same brush I applied Naked 2 to the outer crease to add definition.  I dipped that same brush into Faint to build the color up a bit more and blended out the crease.  These shadows are so creamy and easy to blend.  Take your time here though! Blending is the most important part!  I added some Venus to my inner corner just to make my eyes appear bigger since Andi's always pop!  I finished off the eye with a bit of blackish-brownish eyeliner across the tops of my lids.

3. Concealer: A tip I learned is to apply your concealer after your eye make up.  This cleans up any fall out you may have had from your eyeshadow, and you can also make the outer line where your eyeshadows end more clean cut by running your concealer next to your shadows.  I used my favorite concealer of the moment, the Maybelline Instant Age Rewind Concealer.  Run your blending brush over that line a few times to avoid too harsh of a line. I set my concealer using MAC's Pro Powder in Emphasize. This helps to brighten the face a bit, and Andi always has a bright looking complexion.

4. Powder/Bronzer/Blush:  After my foundation has had a moment to sink into my skin, I set it using my Hourglass Powder in Diffused Light (my obsession as you guys know...).  Andi's cheeks look natural with a bit of a contour.  For this, I used my Chanel Bronze Universal with an angled contour brush and on the tops of my cheek bones I applied MAC's Blush in Gingerly.  A warm blush with the perfect amount of color.  I skipped the highlighter because Andi's glow looks as if it's coming from within, and the cream bronzer gives that effect.  I skipped the glittery shimmery highlighter for this look.

5. Mascara: Long, feathery lashes are the focus here.  I chose my Maybelline Falsies mascara in Blackest Black for a classic look.

6. Eyebrows: Andi's eyebrows are full and have a natural shape.  No arches here so I kept it simple.  I filled them in using a dark brown powder with an angled eyeliner brush.

7. Lips: Ah, her signature nude lip.  I used Urban Decay Naked 2 lipliner, Urban Decay Naked 2 Revolution lipstick, and a Buxom nude gloss over top.  I blended all of those out with my finger to make the lips appear softer but still glossy.


If you're interested in re-creating Andi's look, I hope you find these tips helpful!  
Are you happy Andi chose Josh??? :-) 

xoxo, Molly

Thursday, July 24, 2014

Summer Proof Makeup.

Summer proof makeup (choirs sing).  We ALL struggle with having our makeup last all day.  I'll be the first to raise my hand.  With my job, I'm driving in the car for 8 hours in middle Georgia heat and humidity.  My car's A/C is not enough to keep my makeup nice and fresh.  And in the middle of summer no one wants to cake on more makeup.  Less is more in the summer! How cute are those freckles shining through? (But always wear your SPF, not too many freckles... :-)) So, over time I've come up with some tips and tricks that have helped save the humid, hot, makeup melting struggle. 


1. Exfoliate.  
I do this step about 3 times a week.  I usually use a small grit scrub at the beginning of my week, and then an exfoliating toner throughout my week.  This helps keep that dead skin away so that your makeup adheres better.  It also helps your skin to have a smooth canvas--you'll notice a difference in how smooth your makeup goes on.  My top picks: Facial Radiance Polish by First Aid Beauty and Clarins Gentle Exfoliating Toner.

2. Moisturize or Prime.
This is your most important step.  For me, a moisturizer in the summer is hard to find.  I have normal to dry skin so I need something lightweight but hydrating at the same time.  I love Ole Henriksen's Sheer Transformation Moisturizer because it is lightweight and makes my skin feel so smooth.  It has AHA's in it also, which provide gentle exfoliation over time.  It's also oil-free--another plus for summer time!
For something even lighter, I go for one of my SPF's and use them as a moisturizer.  My two favorites are Clarins UV Plus Multi Protection or Pur-Lisse Pur Protect SPF 30 Daily Moisturizer.
Oily skin girls-Stick to a primer with SPF-Smashbox makes amazing ones with all different purposes.

3. Wait or BB it up.
After prepping your face with a moisturizer, I suggest waiting about 10 minutes before applying your makeup. I always find when I apply it right on top it usually just blends in with the moisturizer and slides around a bit more.  When the moisturizer has a chance to absorb it adheres better!  I use this 10 minutes to do my hair or put my work clothes on for the day, etc.  Don't have an extra 10 minutes in the morning? Skip the moisturizer and find a good BB cream or tinted moisturizer that does it all-prime, protect, hydrate, and cover. BAM. Done. My top picks: Bobbi Brown BB Cream SPF 35 and NARS Radiant Tinted Moisturizer with SPF 35.

4. Setting Spray (Yes before makeup, or after if you apply BB cream).
Yep, I'm saying it.  Spray your face with a makeup setting spray BEFORE you apply your makeup.  I know this seems excessive, but I'm telling you... it's like super glue for your makeup, AND it works! My top picks: Urban Decay All-Nighter Make Up Setting Spray for normal skin and Urban Decay De-Slick Make Up Setting Spray for oily skin

5. Apply.
Put on that makeup, gorgeous. :-)

6. Powder.
Finely milled powders are the best powders! No powder compares to my Chanel Loose Powder, but there are some translucent powders I also love.  The Revlon Photo Ready Translucent Finisher and the Hourglass Ambient Lighting Powder in Diffused Light are my favorites.  Both of these powders set your makeup and absorb oil throughout the day--viola!

Six steps??!! I know, I know.  You're probably thinking...ain't nobody got time for that.  I'm telling you, try it. :-) You won't regret it! 

xoxo, Molly